![[ Node.js ] 맛보기](https://img1.daumcdn.net/thumb/R750x0/?scode=mtistory2&fname=https%3A%2F%2Fblog.kakaocdn.net%2Fdn%2FbYSMLn%2FbtrDAj8qrGr%2F1fuOQ6IYRicEBUVClorkJ1%2Fimg.png)
⚪ app.js

import express from "express";
import cors from "cors";
import bodyParser from "body-parser";
import "dotenv/config";
import favicon from "serve-favicon";
import path from "path";

import defaultRouter from "./router/index.js";
import userRouter from "./router/user.js";
import tokenRouter from "./router/token.js";

const app = express();

// favicon
const __dirname = path.resolve();  // 현재 경로를 받아오기 위함(app.js가 있는 위치)
app.use(favicon(path.join(__dirname, "../home/build/favicon.ico")));

// public
// CSS 파일 및 JS 파일과 같은 정적 파일 경로를 전달하여 직접적인 파일을 제공하는데 사용된다.
app.use(express.static("../home/build"));

// cors
app.use(cors({
    // 특정 도메인에만 cors 허용
    origin : "http://localhost:3000", // default react server
    credentials : true,
}));

// body parser
// req.body의 json을 해석하기 위함
app.use(bodyParser.json());
app.use(bodyParser.urlencoded({extended : false}));

// port
app.set("port", process.env.PORT || 8081);

// routing
// 3️⃣ 라우팅 객체를 app 객체에 등록
app.use("/", defaultRouter);
app.use("/user", userRouter);
app.use("/token", tokenRouter);

// server start
app.listen(app.get("port"), () => {
    console.log(`${app.get('port')} 포트에서 대기 중입니다.`);
})
🔴 express란?
🔊 Node.js 웹 애플리케이션 프레임워크
🔊 스크립트로 서버를 구축하고, 서버에서 스크립트가 작동되도록 해주는 런타임 플랫폼
🟠 path란?
🔊 node의 내장모듈로써 스크립트에서 폴더나 파일의 경로를 쉽게 문자열로 만들어주는 유틸리티 모듈
path.join
🔊 인자로 받은 경로들을 하나로 합쳐서 문자열 형태로 path를 리턴한다.
path.join('/a', 'b', 'c/d'); // '/a/b/c/d'path.resolve
🔊 맨 오른쪽부터 왼쪽으로 경로인자들을 합쳐나가며, 합쳐 나가는 중 /를 만나면 절대 경로로 인식해서 나머지 경로 인자들을 무시한다.
path.resolve('/foo/bar', './baz');  // 'foo/bar/baz'

path.resolve('foo/bar', '/tmp/file/');  // 'tmp/file'
🟡 app.use란?
🔊 미들웨어 기능을 마운트하거나 지정된 경로에 마운트하는데 사용된다.
🔊 app.get(), app.post() 등과 달리 요청 URL을 지정하지 않아도 사용할 수 있으며, 해당 경우에 URL에 상관없이 매번 실행된다.
🟢 cors란?
🔊 자신이 속하지 않은 다른 도메인, 다른 프로토콜, 다른 포트에 있는 리소스를 요청하는 cross-origin HTTP 요청 방식이다.

🔎 왼쪽의 웹사이트는 domina-a.com 서버로 구동되고 있다. 파란색 이미지는 구동 중인 도메인과 동일한 서버로부터 자료를 요청하지만, 빨간색 이미지는 다른 도메인에 자료를 요청하고 있는 상황이며, 이런 상황이 cors이다.
🔎 서버는 기본적으로 cors 방식을 제한해둔다. 임의의 웹사이트들이 악의적으로 request를 보내어 특정 서버의 세션을 탈취하거나 무리가 가는 행위를 할 수도 있기 때문이다.
🔵 bodyParser.urlencoded이란?
app.use(bodyParser.urlencoded({extended : false}));🔊 클라이언트에서 post로 보내준 데이터들을 자동으로 파싱해주는 body-parser 모듈을 사용하면 같이 설정해줘야 하는 설정이다.
🔊 extended 옵션이 true일 경우, 객체 형태로 전달된 데이터 내에서 또 다른 중첩된 객체를 허용하며, false는 허용하지 않는다는 의미이다.
🔊 false 값일 시 node.js에 기본으로 내장된 queryString, true 값일 시 따로 설치가 핑료한 npm qs 라이브러리를 사용한다.
⚪ router / index.js
import express from "express";
import path from "path";

const __dirname = path.resolve();
// 1️⃣ 라우터 객체 참조
const router = express.Router();
// 2️⃣ 라우팅 함수 등록
router.get("/", (req, res) => {
    // 파일을 옥텟 스트림의 형태로 전송
    res.sendFile(path.join(__dirname, "/index.html"));
})

router.post("/test", (req, res) => {
    console.log(req.body);
    // 다양한 유형의 응답을 전송
    res.send(req.body);
})

export default router;
🔴 미들웨어
🔊 미들웨어는 요청에 대한 응답 과정 중간에 껴서 동작하며 작동하는 경로를 선택할 수 있으며, req, res, next를 인자로 가진 함수이다.
💡 req : 클라이언트에서 오는 요청 정보가 담긴 객체 (클라이언트 -> 서버로 받는 내용)
💡 res : 서버가 응답해주는 응답 정보가 담긴 객체 (서버 -> 클라이언트로 보낼 내용)
💡 next : 현재 미들웨어에 이어서 다음 미들웨어를 실행한다. 요청-응답 주기를 종료하지 않은 상태에서 next()를 실행하지 않으면 해당 요청은 정지된 채로 방치된다.
애플리케이션 레벨 미들웨어
🔊 미들웨어를 app 인스턴스에 바인딩하는 미들웨어이다.
const app = express();🔊 app.use()나 app.METHOD() 함수를 이용해 미들웨어를 사용할 수 있다.
라우터 레벨 미들웨어
🔊 router 인스턴스에 미들웨어가 바인딩 되는 것이며, 이 외에는 애플리케이션 레벨 미들웨어와 차이가 없다.
const router = express.Router();🔊 router.use()나 router.METHOD() 함수를 이용해 미들웨어를 사용할 수 있다.
// 마운트 경로가 없는 미들웨어 함수는 앱이 요청을 수신할 때마다 실행된다.
router.use((req, res, next) => {
    console.log('Time: ', Date, now());
});
// /user/:id 경로에 대한 모든 유형의 HTTP 요청에 대해 실행된다.
router.use('/user/:id', (req, res, next) => {
    console.log('Request Type: ', req.method);
});
// /user/:id 경로에 대한 GET 유형을 처리한다.
router.get('/user/:id', (req, res, next) => {
    res.send('USER');
});
router.get('/pages/:id', (req, res, next) => {
// pages id가 0이면 'regular'가 아닌 'special'로 넘어감
if (req.params.id == 0) next('route');
// pages id가 0이 아니라면 'regular'로 넘어감
else next();
}, (req, res, next) => {
res.send('regular');
});
// pages id가 0일 때 넘어올 미들웨어
router.get('/pages/:id', (req, res, next) => {
res.send('special');
}
🔎 next()는 라우터 미들웨어 스택의 다음 라우터로 이동하며, next('router')는 라우터 미들웨어 스택을 벗어난 다음 라우터로 제어가 넘어가게 한다.
🔎 next('route')가 아닌 문자열이 next 함수의 인수로 입력될 경우, 모두 다 오류 처리 미들웨어로 처리된다.
router.use((err, req, res, next) => {
    console.error(err.stack);
});
⚪ data / data.js
const userData = [
    {
        id : "test",
        password : "1234",
    },
    {
        id : "mzrnd",
        password : "1234",
    }
]

export const has = (id, password) => {
    for(const user of userData) {
        if(user.id === id+"" && user.password === password+"") {
            return true;
        }
    }
    return false;
}
export const add = (id, password) => {
    userData.push({id, password});
}
🔴 forEach vs for ...in vs for ...of 차이점
🔊 forEach : Array, Map, Set 등에 사용할 수 있으며, 배열의 요소들을 반복하여 작업을 수행할 수 있다.
var items = ['item1', 'item2', 'item3'];

items.forEach(item => {
    console.log(item);
};
// item1, item2, item3
🔊 for ...of : 반복되는 객체의 value에 접근할 수 있다.
var iterable = [10, 20, 30];

for (let value of iterable) {
    console.log(value);
}
// 10, 20, 30
🔊 for ...in : 반복되는 객체의 key에만 접근할 수 있으며, value에 접근하려면 인덱스로 접근해야 한다.
var obj = {
    a: 1,
    b: 2,
    c: 3
};

for (let prop in obj) {
    console.log(prop, obj[prop]);
}
// a 1, b 2, c 3
⚪ router / user.js
import express from "express";
import { has, add } from "../data/data.js";
import { verifyToken, signNewToken } from "../middlewares/jwt.js";

const router = express.Router();
router.post("/", async (req, res)=>{
    console.log(`${req.ip} 에서 보낸 request :`);
    console.log("/user", req.body);
    try {
        const result = await has(req.body.id, req.body.password);
        if(!result) throw new Error("등록되지 않은 사용자");
        const token = await signNewToken(req.body.id);
        if (token) {
            res.json({
                id : req.body.id,
                status : true,
                token,
            })
        }
    } catch(err) {
        console.log(`${err.name} : ${err.message}`);
        res.status(419).json({
            code : 419,
            id : req.body.id,
            status : false,
            message : "등록되지 않은 사용자입니다.",
        })
    }
})

router.post("/test", verifyToken(cbFail), (req, res)=>{
    console.log("/user/test", req.body);
    res.json(req.decoded);
})

export default router;
🔴 res.send와 res.json 비교
🔊 res.json 함수 내부에 res.send를 내포하고 있다.
🔊 object에 json을 넣고 res.send(object)를 실행했을 때 함수의 호출 순서는 아래와 같다.
- res.send(object)
- res.json(object)
- res.send(string)
🔊 반면, res.json(object)를 실행했을 때 함수의 호출 순서는 아래와 같다.
- res.json(object)
- res.send(string)
🔑 따라서, JSON 응답을 한다면 res.send보다 res.json이 추가 비용이 덜 들기 때문에 효율적이다.
🟠 res.status().json() 해석
🔊 status() 함수는 HTTP 상태 코드를 반환한다. 하지만, 상태 코드만 반환할 뿐, end()나 send() 같은 전송 메서드를 추가로 호출해야 전송할 수 있다.
🔊 json() 함수는 위에서 보았듯이 내부에 send() 함수를 내포하고 있기 때문에 둘을 순서대로 선언하면 상태 코드와 상태 코드에 대한 설명을 클라이언트에 전송할 수 있다.
⚪ router / token.js
import express from "express";
import jwt from "jsonwebtoken";

const router = express.Router();
router.post("/", (req, res)=>{
    console.log(req.body);
    try {
        jwt.verify(req.body.userToken, process.env.JWT_SECRET);
    } catch(err) {
        if (err.name === "TokenExpiredError") {
            return res.status(499).json({
                code : 499,
                message : "토큰이 만료되었습니다.",
            })
        }
        return res.status(401).json({
            code : 401,
            message : "유효하지 않은 토큰입니다.",
        })
    }

    return res.status(201).json({
        code : 201,
        isValid : true,
    })
})

export default router;
⚪ middlewares / jwt.js
import jwt from "jsonwebtoken";

export const verifyToken = (req, res, next, cbFail) => {
    try {
        // 요청 헤더에 저장된 토큰과 비밀키를 사용하여 토큰을 req.decoded에 반환
        req.decoded =  jwt.verify(req.headers.authorization, process.env.JWT_SECRET);
        return next();
    } catch (err) {
        if (cbFail) cbFail();
        if (error.name === "TokenExpiredError") {
            return res.status(499).json({
                code : 499,
                message : "토큰이 만료되었습니다.",
            })
        }
        return res.status(401).json({
            code : 401,
            message : "유효하지 않은 토큰입니다.",
        })
    }
}

export const signNewToken = (id, cbFail) => {
    try {
        const token = jwt.sign({
            id : id,
        }, process.env.JWT_SECRET, {
            expiresIn : process.env.JWT_TOKEN_EXPIRE,
            issuer : "Mediazen",
        });
        return token;
    } catch(err) {
        console.error(err);
        if(cbFail) cbFail();
        return false;
    }
}
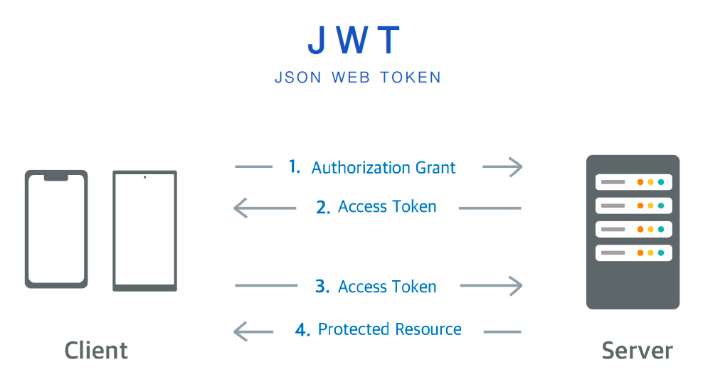
🔴 jwt란?
🔊 JSON Web Token으로 전자 서명된 URL로 이용할 수 있는 문자만 구성된 JSON이다.
🔊 JWT는 서버와 클라이언트 간 정보를 주고 받을 때 HTTP request header에 JSON 토큰을 넣은 후 서버는 별도의 인증 과정 없이 헤더에 포함되어 있는 JWT 정보를 통해 인증한다.
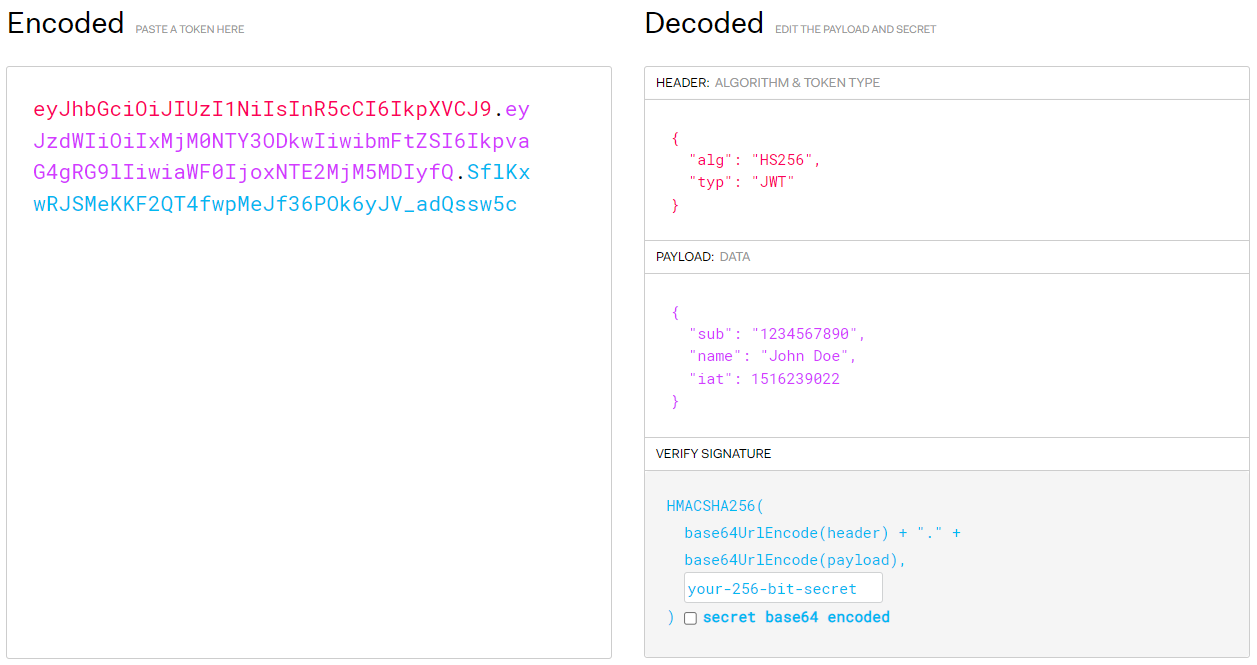
🟠 jwt.verify(token, scretKey)
🔊 토큰 인증(확인)
1️⃣ token : 클라이언트에게 받은 토큰. 디코딩하여 payload 부분을 추출할 수 있다.
2️⃣ secretKey : 토큰 발급 시 사용했던 secretKey. 보안을 위해 .env 파일에 상수로 정의해 놓는다.
3️⃣ return : 유효성 검증 통과 시 jwt payload 추출
🟡 jwt.sign(payload, secretKey, option)
🔊 토큰 발급
1️⃣ payload : 토큰의 payload 부분이다.
2️⃣ secretKey : 보안을 위해 .env 파일에 상수로 정의해 놓는다.
3️⃣ option : 어떠한 알고리즘을 사용할 것인지, 만료 기간은 언제인지, 발급자는 누구인지 등의 옵션을 넣어줄 수 있다.
4️⃣ return : 위의 인자들을 사용하여 만들어진 토큰을 리턴한다.
'NodeJS' 카테고리의 다른 글
| [ NodeJS ] MongoDB (0) | 2022.08.23 |
|---|---|
| [ NodeJS ] express (0) | 2022.08.23 |
| [ NodeJS ] 파일 (0) | 2022.08.23 |
| [ NodeJS ] 소개 (0) | 2022.08.23 |